目次
- 1 What Is the Procedure for Orthodontic Bracket Bonding?
- 2 Why Are Brackets Used in Orthodontic Treatment?
- 3 What to Know Before Your Bonding Appointment
- 4 Orthodontic Bracket Bonding Procedure (7 Steps)
- 5 1. Tooth Cleaning and Drying
- 6 2. Surface Treatment (Etching)
- 7 3. Applying the Primer (Bonding Agent)
- 8 4. Precise Bracket Positioning
- 9 5. Light-Curing to Set the Bracket
- 10 6. Wire Placement and Adjustment
- 11 7. Final Check of Bite and Fit
What Is the Procedure for Orthodontic Bracket Bonding?
Welcome, and thank you for reading this article.
In this post, we walk you through the actual procedure used in our dental clinic for bonding orthodontic brackets — broken down into 7 easy-to-follow steps.
Let’s start with the basics: why are brackets necessary in orthodontic treatment?

Why Are Brackets Used in Orthodontic Treatment?
Orthodontic brackets are small devices bonded to the teeth to hold the archwire in place. By attaching brackets to the tooth surface, we can gradually guide each tooth into its ideal position.
【Key Points】
- Brackets must be placed in precisely the correct position
- They work together with the wire to move the teeth
- They allow continuous force to be applied to the teeth over an extended period
This is why bracket bonding requires exceptionally careful and precise technique.
What to Know Before Your Bonding Appointment
To help your appointment go smoothly, we recommend the following preparation:
- Brush your teeth thoroughly beforehand (we will clean them at the clinic, but a fresh start helps)
- Get a good night’s sleep and come in good health — you will need to keep your mouth open for an extended period
- Allow plenty of time and arrive without rushing
Starting orthodontic treatment can feel a little nerve-wracking, but knowing what to expect in advance will put you at ease.
Orthodontic Bracket Bonding Procedure (7 Steps)
Now let’s walk through the actual bonding process step by step.
1. Tooth Cleaning and Drying
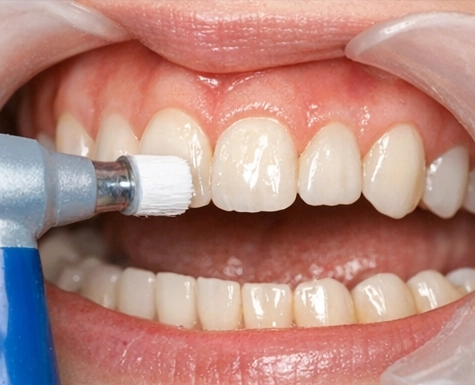
We begin by thoroughly cleaning the tooth surface with a special paste and a rotary brush. Any residual plaque or oil can weaken the bond, so this step is essential.
The teeth are then air-dried to remove all moisture from the surface.
If this step is not done properly, the brackets are more likely to come loose — making it one of the most important parts of the process.
2. Surface Treatment (Etching)
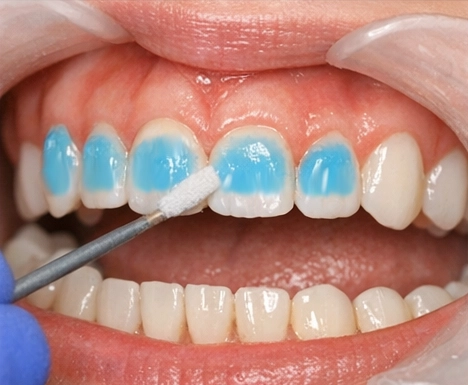
Next, the tooth surface is very slightly roughened in a process called etching. A phosphoric acid gel is applied to the tooth and left for several seconds.
The purpose is to create a microscopic texture on the tooth surface so that the bonding agent adheres more effectively.
You may notice a mild tingling sensation, but there is very little discomfort — so please don’t worry.
3. Applying the Primer (Bonding Agent)
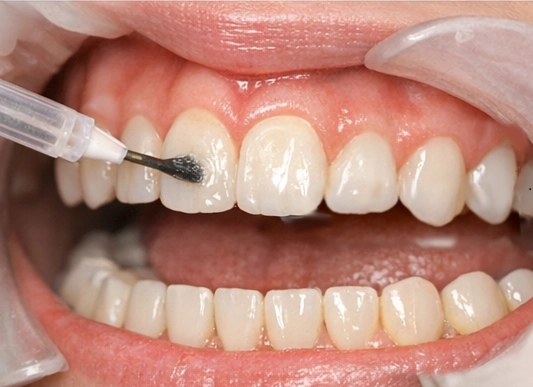
After etching, the tooth is rinsed and dried, then a bonding agent called primer is applied.
The precision of this step directly affects how securely the bracket will stay in place.
A thin coat of clear primer liquid is applied, then briefly light-cured to begin setting.
4. Precise Bracket Positioning
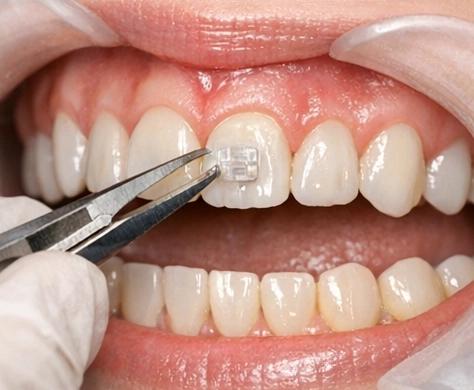
This is the most critical step. Each bracket is carefully placed on each tooth one by one, in exactly the right position.
Even a slight misalignment can affect the final tooth position, so this requires intense concentration and precision.
We know it can be tiring to hold your mouth open for this part — but it is a very important moment, and we appreciate your patience as we work through it together.
5. Light-Curing to Set the Bracket
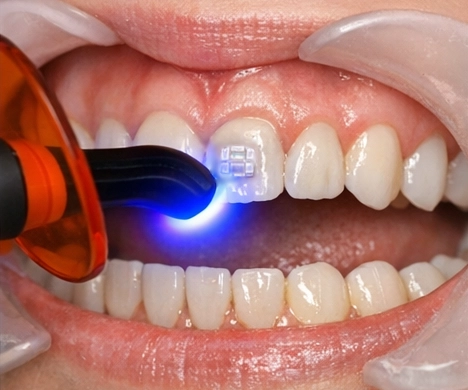
Once the bracket is in position, a curing light is used to harden the bonding agent.
This is the same blue light used to set tooth-colored fillings — applied for several seconds per bracket.
After this step, the bracket is firmly secured and will hold up well through daily activities.
6. Wire Placement and Adjustment
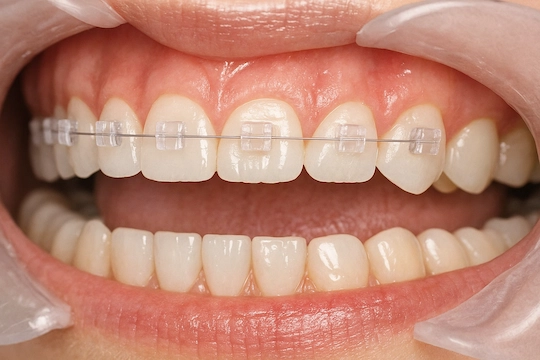
Once all brackets are bonded, the archwire is threaded through the slot running along the center of each bracket.
This allows the wire’s natural spring and stiffness to transmit force through the brackets, gradually moving the teeth into alignment.
We start with a thin, flexible wire. As treatment progresses, we switch to progressively stronger wires and add bends to control three-dimensional tooth movement across the entire arch.
7. Final Check of Bite and Fit
Finally, we check the bite and confirm that no brackets or wire ends are pressing uncomfortably against the cheeks or gums.
If needed, we will trim any protruding wire ends or cover sharp spots with orthodontic wax.
That completes our guide to the 7-step orthodontic bracket bonding procedure.
We hope this article has been helpful in preparing you for your appointment.
A follow-up article covering what to expect after bracket and wire placement — including care tips and dietary advice — is also in the works. Stay tuned!